Choosing a smart control panel is not only a screen-size decision. The panel has to fit the room, connect to the right devices, run the right software, support the intended user workflow, match the wall installation, and be practical for deployment. A good panel feels simple to the end user, but that simplicity depends on hardware, Android image control, wireless stability, UI planning, branding, and production support.
A useful review for Smart Control Panel Selection Guide: Screen Size, Installation, Software, and Model Fit is to walk through the first ten minutes after installation. The panel should power up cleanly, join the intended network, open the right app or UI, keep touch response stable, and expose only the settings that the installer or operator is allowed to change.
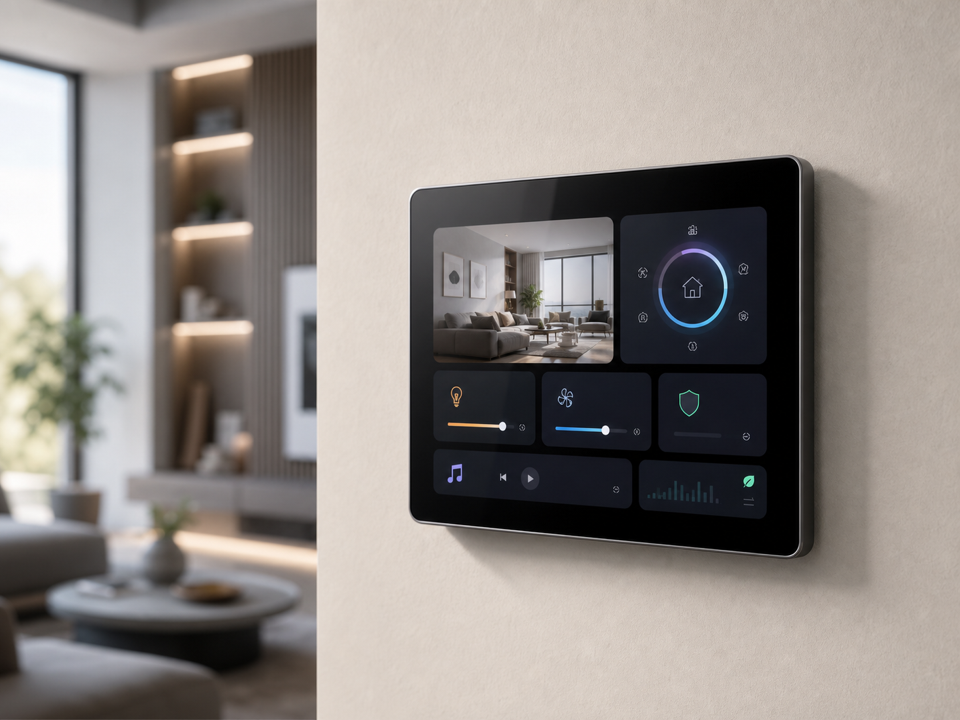
For home automation, hotel rooms, apartments, meeting rooms, and connected building interfaces, a complete Smart Control Panels product can be faster than developing an enclosure, display, Android board, and software stack separately. The right model should be selected from the final installation scenario, not from the largest screen alone.
Start from the room workflow
Before comparing S6E Pro, S8E, S9E, T7E, T8E, T10E, and T10E Pro directions, define what the panel controls. A home panel may focus on lighting scenes, HVAC, curtains, music, security, and intercom. A hotel panel may need room modes, service requests, climate control, language support, and a locked guest workflow. An apartment panel may need building access, elevator control, smart home scenes, and property service integration.
If the product needs only a board-level Android interface behind a custom enclosure, review Android SBC or Custom SBC instead. If the project wants a finished wall-mounted device, smart control panel selection is the better starting point.
Screen size and installation
Screen size needs to match the usage distance, wall space, and UI density. A compact panel can work well for basic scene control. A larger display may be better for dashboards, room status, multi-zone control, video, or richer UI. The wall box, mounting depth, power wiring, and cable route should be checked before model selection.
| Selection item | What to confirm |
|---|---|
| Screen size | Viewing distance, UI density, room type, installation height |
| Mounting | Wall box, screw position, depth, cable entry, service access |
| Power | Power input, backup needs, local wiring, installation standard |
| Wireless | Wi-Fi, Bluetooth, gateway connection, antenna environment |
| Interfaces | Relay, RS485, Ethernet, USB, audio, sensor, or local I/O needs |
| Branding | Logo, color, UI style, packaging, model label |
The panel should look appropriate in the room. A technically capable device can still fail a project if it feels too large, too small, too bright, or awkwardly mounted.
A simple mock installation is worth doing before a large order. Print the screen size on paper, place it at the expected wall height, and let the project team stand where the user will stand. This rough check often catches problems that drawings miss. A 10-inch panel can look excellent in a lobby or meeting room but too large beside a bedroom switch. A smaller panel can be elegant for scenes and HVAC, but frustrating if the UI needs floor plans, cameras, or many room zones.
Android software and UI behavior
Many smart control panels use Android because it supports a rich UI, touch interaction, app workflows, language switching, media, and familiar development tools. The software image needs review for boot logo, launcher, app auto-start, permissions, navigation restrictions, screen timeout, update method, and recovery behavior.
The official Android dedicated devices documentation is useful background for locked-down device concepts. In a real panel project, the key question is how the supplier configures the Android image for the intended room workflow.
Connectivity and ecosystem planning
Smart control panels may connect directly to devices, communicate with a gateway, run a customer app, or act as a room interface for a larger system. Confirm whether the project needs Wi-Fi, Bluetooth, Ethernet, RS485, relay control, voice, speaker, microphone, or app integration. If the panel is part of a broader smart home ecosystem, clarify whether the panel only displays the UI or also manages device communication.
Matter, Zigbee, Wi-Fi, Bluetooth, KNX, RS485, and cloud APIs can all appear in control projects, but not every panel needs every protocol. The better decision is to define the system architecture first, then select the panel and software path.
For procurement, connectivity should also be checked against the actual installation site. A panel that works well in an office demo may behave differently in a hotel corridor, apartment wall box, or villa with thick walls. Ask whether Ethernet is required for reliability, whether Wi-Fi coverage is already planned, and whether the panel needs to keep basic room control available if internet access is unavailable.
In hotel and apartment projects, do not assume the panel is only a screen. Some projects expect the panel to talk to a gateway. Others expect it to control local devices directly through RS485, relay, Ethernet, or a customer application. The difference affects model choice, wiring, software image, installation labor, and maintenance. A clear system diagram is usually more useful than a long feature wish list.
For projects using a customer app, test the actual APK early. Check boot-to-app time, screen rotation, permissions, background services, network reconnection, audio behavior, sleep and wake, and whether users can leave the intended interface. A panel can pass a visual review and still fail the project if the software image does not match the operating model.
Model selection and project fit
Use smaller panels when the user only needs simple scenes, status, and quick control. Use larger panels when the interface includes dashboards, multiple rooms, media, video, or complex navigation. Select higher-spec models when the app is heavier, the UI is richer, or future software features may grow.
Sample testing needs to cover more than appearance. Install the panel at the expected wall height, test it under room lighting, check touch response, confirm boot time, verify Wi-Fi strength, and let non-engineering users try the main scenes. This usually reveals whether the screen is large enough, whether the UI is too dense, and whether the selected model fits the room experience.
Common deployment mistakes
The first mistake is selecting the largest screen because it looks premium in a catalog. In real rooms, the panel should feel proportional to the wall, switch area, furniture, and user distance. Bigger is useful only when the interface takes advantage of the space.
The second mistake is leaving software restrictions until the end. A room control panel often needs to behave like a dedicated device, not like an open Android tablet. Decide whether settings are hidden, whether users can install apps, how updates are handled, what happens after reboot, and how support teams recover a unit.
The third mistake is ignoring installation consistency. If one project uses different wall boxes, power wiring, Wi-Fi coverage, or room layouts, the same panel may not perform the same way everywhere. Before volume deployment, test the device in at least one realistic room or mock-up, not only on a desk.
What to prepare before inquiry
A useful inquiry needs to cover room type, target screen size, wall box or mounting standard, power condition, wireless or Ethernet plan, required interfaces, software workflow, APK or UI status, branding requirements, packaging needs, sample quantity, and project quantity. If the panel must match an existing design style, include photos or drawings of the room.
For hotel and apartment projects, include the system architecture: what the panel connects to, what protocols are used, whether internet access is required, and what functions must continue locally during network problems. This lets the supplier recommend a panel model and software scope instead of only sending a price list.
For broader preparation, read Smart Control Panel Project Planning Checklist and Android SBC for Smart Terminals: Hardware, Software, and Production Checklist. These help connect panel selection with software, wireless, production, and user workflow.
Final recommendation
Choose a smart control panel by room workflow, screen size, wall installation, software behavior, connectivity, branding, and production support. The best model is not always the largest or newest one. It is the one that fits the room, supports the control system, and can be deployed consistently across the project.
Frequently Asked Questions
What details are useful before we talk about a Smart Control Panels build?
Send the use case, OS preference, display or I/O list, enclosure limits, power input, wireless needs, target quantity, and timing. With that context, Avontek can suggest a Smart Control Panels hardware path that fits the real device instead of only comparing board specifications.
When is a custom SBC worth considering for a Smart Control Panels product?
A custom SBC is worth reviewing when the device needs a fixed PCBA outline, connector position, display interface, power input, wireless module, mounting method, or cost target that a catalog board cannot meet cleanly.
Can Avontek stay involved after Smart Control Panels samples are built?
Yes. Avontek can help with Smart Control Panels board choice, Android or Linux BSP discussion, peripheral checks, sample bring-up, test fixtures, image review, and factory coordination.